
Projects
These projects are from the course I am taking, and each project will display the skills of my 2D and 3D art. Each project will be explained and processed.
Star Wars Vehicle

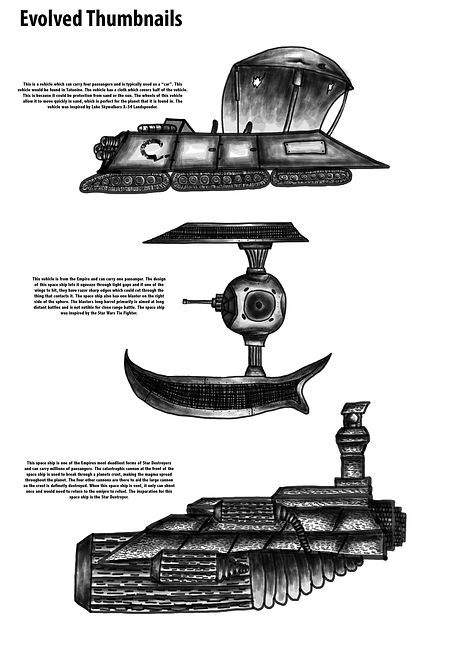
To Start this project off, I made sketches and concepts of Star Wars themed vehicles. I looked at pictures, such as Tie Fighters and Star Destroyers to get inspiration for my concepts. I saw how the vehicles in the Star Wars universe are constructed and what makes them a Star Wars vehicle to begin with. The thumbnails that I made were done quickly, but with accuracy. This was because I needed to know how the object would look like when creating the evolved thumbnails. In the evolved thumbnail section, I made sure to add much more detail and give a more believable look to them.

After consideration and planning, I decided to go with a "scavenger" vehicle, which would be found on the planet of Tatooine. This vehicle would be combined with many different pieces of metal and technology, which would be combined together to make a sort of hybrid vehicle of many different vehicles. This concept had to be at the best detail, as I needed to 3D model the vehicle and I needed to know how the vehicle looked in both angles.


This is the final outcome of this project. I looked at each detail of the concept and how it effects the entire vehicle as a whole. I made sure to add a rusty metal texture, as it makes the vehicle and all of the parts more believable. This is because all of the vehicles parts weren't found at the same time.
PS4 Game Cover

This was a small project that I took to create a custom ps4 game cover. For this project, I decided to focus on an Egyptian theme and have the objects in this cover be statues and relics. I mainly concentrated on making the centre point of the cover as detailed as I could manage. I looked at some references of pharos statues and different hieroglyphs to help me in making the Egyptian theme more believable. Since the main focus of the cover were statues, the main colour of the cover was a dirty lime colour. This was accurate, as thats the colour the statues were (based on my research).
TROVE Wallet

Before I started to look at different designs and started to create concepts, I needed to decide on what will be the style of the design and if it would match the style of the TROVE wallet. To begin this project, I looked at three different styles (Dot, Blend and Line). After looking at each style, I decided to choose the line style, as the design can stand out much more.

When creating each concept, I made sure of two things, to make it minimalistic and to add a lot of colour. I needed to keep it minimalistic, as the TROVE wallet will be quite small and people from far away wouldn't be able to see all of that detail. To further this, there could be so much detail that you wouldn't even recognise what that design even is.
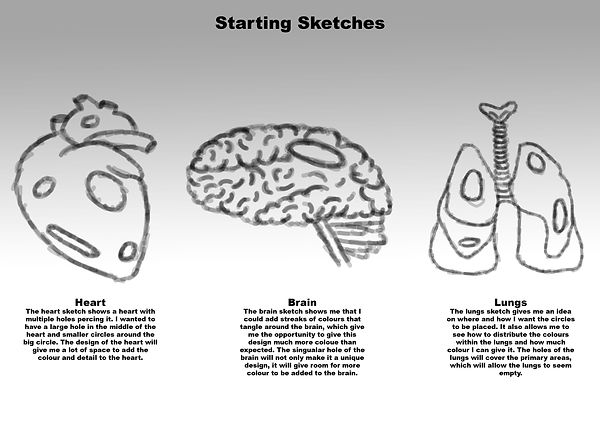
This was the start of the final designs. I looked at different images of organs and made quick sketches of them. I then positioned and made extra details, so that I could use them as reference when I start creating my final design.

These are the final designs. The designs use very abstract colouring and shapes. I made holes and drips coming off the design, making it look artistic and very eye-catching. The combination of different colours make it very bright and contrasting.
Followed Tutorial

This is a black and white design I made when using a tutorial to improve my skill. I used different tones and shades to create this portrait of this man. I looked at how each face feature was drawn and how much highlight and shadow was applied to that area.

At this point in the tutorial, I had to add colour to all places. I had to make the skin look as believable as possible. To achieve this, instead of using straight up black, I used a dark red to make it seem like there is blood flowing underneath the skin. I always used a darker version of a colour when creating shadows in an area. This made the skin look real and smooth.